

Due to rising pollution levels and poor water quality, a good water purifier has become a necessity in every household. Although there are numerous water purifier models in the market, the quality and durability matter the most!
Say hello to RO Purifiers! The efficiency of these RO purifiers can drop for a variety of reasons. If you’re having trouble figuring out how to overcome this? We might be able to assist.
But did you know that these filters and membranes need replacement after a particular time? Just like every other filter, they wear out too!
You should read this article because it is going to save you ALOT of money! In this article, we will discuss an easy, step-by-step procedure to replace your filters and membrane all by yourself. Additionally, we will also help you determine the right time to change them!
Components Of A Reverse Osmosis Filtration System
If we don’t know how something works, how can we change it?
RO systems typically have three, four, or five filter stages. The number of steps involved in the process of purification may vary depending on the model. Generally, the entire process can be divided into four phases. Every stage utilizes a specific membrane/filter for the purification of impurities.
Let us take a closer look at the purifier to understand how it works
1. Sedimentation Tank
The sediment filter is functionally similar to a sieve. It separates large particles and a few dissolved solids. Particles like soil, sand, grit etc., are separated via this membrane.
Since these solids are relatively more prominent, they can clog the membrane and damage the delicate RO membrane.
If the pre-filter is not adequately maintained or changed regularly, it can foul or become blocked, rendering it incapable of protecting the RO membrane.
2. Pre Carbon Filter
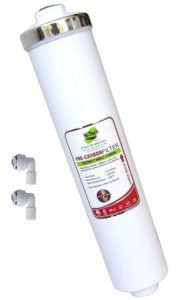
Several studies have found that chlorine can intensify the biofouling of the RO membrane. This stage disinfects chlorine and other molecules that alter the taste and odour of water. These filters are made of carbon, which can absorb a wide range of gases and molecules.
According to specialists, every 12 months, pre-filters should be changed.
3. Reverse Osmosis Membrane
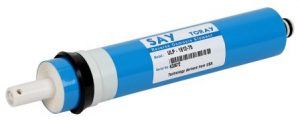
The most crucial component that removes significant health risks is the RO membrane. In this method, the process used is reverse osmosis. It is the opposite of the normal osmosis process. Due to external pressure, water flows from a high concentration area to a low concentration area in this method.
The contaminants that the trapped in the membrane are released using a pipe into the drain. Typically, these membranes come with a warranty. The duration of the warranty may vary depending on the purifier.
According to some of the top leading purifiers and research articles, these membranes should be replaced every two years, but the duration can also extend up to 5 years.
4. Post Carbon Filter
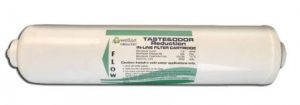
The water is filtered through the post-carbon filter before entering the storage tank. This carbon filter purification stage contributes to improved water quality. Hence it is also referred to as a polish filter.
The filter ensures that all remaining contaminants are removed from the product as it passes through the membrane. It ensures that the product is entirely pure and fit for human consumption.
In the same way as pre-filters, annual replacement is advised.
5. O Rings
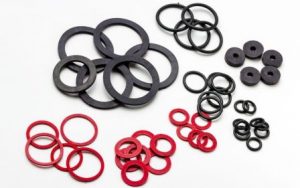
These are circular rings made of Teflon in most cases. They are present to ensure that the housing and housing cap are tightly sealed to prevent leakage and contamination.
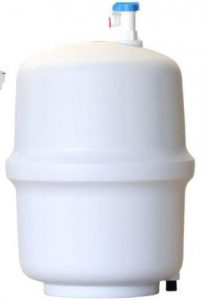
6. Housing
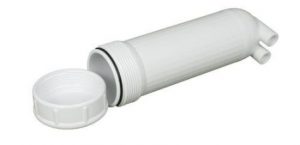
Membrane Housings are canisters or pressure vessels used to store the filters and membranes in a water purifier.
Signs That Indicate A Change In Filter
A good indicator that you need to replace your filter is when you notice any changes in your water quality.
Three red flags for your filter are listed below.
1. Water Pressure
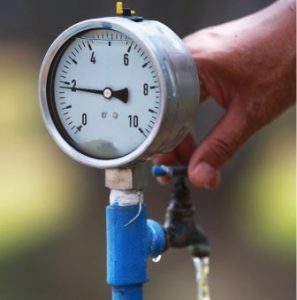
Are you getting antsy as your water glass refills? It is due to impurities clogging your filter. Low water pressure indicates a clogged filter that needs replacement.
2. Taste & Odor
Another tell-a-tale sign is a change in taste or odour. It may result in an unusual taste and smell in the water, primarily if the carbon filters are not functioning correctly. When the filters become clogged, they do not operate as efficiently as they should, and the impurities may enter your drinking water.
3. High TDS
A simple TDS meter can determine the TDS of the water According to WHO guidelines, the ideal TDS should be less than 300ppm. If the TDS is high, it is time to change the filter!
How To Change The Filter Cartridge?
RO purifiers will work efficiently if you clean them and replace them when the need arises. Because filters play an essential role in providing safe and clean water, it is critical to clean the filters appropriately to ensure that you receive clean and safe drinking water.
The first step is to make sure you know your filters! Not every reverse osmosis system employs the same filter. Installing the incorrect replacement filter can compromise the overall efficiency of the RO system. If you are unsure about the type of filters you have or require, you can check the manual to understand it.
Spoiler Alert: It is not that hard!
Pre-Filter Replacement
Pre-filters are filters that are installed before the RO membrane. Depending on the model of the purifier, there are usually 2-3 pre-filters. A step-by-step procedure for cleaning and replacing them is provided below.
Step 1: Turn off all the water supplies before starting the procedure. It will make sure that more water is not added while you are cleaning the system.
Step 2: Don’t forget to turn off the ball valve present near the storage tank.
Step 3: Depressurize the purifier by opening up the RO faucet lever. For reverse osmosis, the pressure used is very high, and you wouldn’t want that pressure to be released while you are cleaning it. Would you?
Step 4: Drain all the water from the tank.
Step 5: Check the housing and identify them. Feel free to use the manual if needed.
Step 6: Open the housing by rotating it clockwise once you have decided the filter you want to replace. If the membrane housing is tight, you can use a wrench.
Step 7: Remove your old filter and clean the inside with soap water.
Step 8: Check the O-Rings and clean them.
Step 9: Insert the replacement filter in the housing compartment.
Step 10: Re-install the housing by rotating it in the anticlockwise direction.
Step 11: Turn on all the valves and check for leakage.
Step 12: Close the RO faucet allowing it to build the pressure back.
CAUTION: You should not touch the new replacement filter with your bare hands when installing it. Otherwise, the filters may become contaminated. You can wear rubber or plastic gloves.
Reverse Osmosis Membrane And Post Filter Replacement
Additional steps are required if you intend to replace the RO membrane or the Post carbon membrane. Let’s dive into it!
If you haven’t already, follow Step 1- Step 5 from the Pre-Filter Replacement Procedure mentioned above.
Step 6: Remove the tubes and pipes that are attached to the housing cap. You might have to press down on the small rings present at the juncture of the tube and the housing cap. Press and hold the ring while pulling the tubing out.
Step 7: Unscrew the housing in the clockwise direction to open it.
Step 8: Wash the housing with soap water and rinse it clean.
Step 9: Remove the filter and replace it with the new one.
Step 10: Don’t forget to inspect the O rings.
Step 11: Reattach the housing by rotating it in the anticlockwise direction.
Step 12: Insert the tubing in the correct location. The tubing should be pushed into the fitting as far as possible, then pulled lightly to secure it.
Step 13: Turn on all the valves and check for leakage.
Step 14: Close the RO faucet allowing it to build the pressure back.
CAUTION: Before removing the housing, make sure to label both tubes to avoid confusion during reattachment.
After restoring the water supply, wait for the storage tank to be refilled. You will realize that the water coming out is discoloured. Don’t be alarmed! It is pretty common since new filters are added, the extra fibres are getting flushed out.
Fill the storage tank twice, then empty it. You should have clean water after that.
FAQs
Time for some FAQs! Getting complete knowledge is crucial, Isn’t it! Let’s discuss some commonly asked questions regarding RO Filters and Membranes.
1. Will a water softener wreak havoc on the RO?
No, a water softener can help to extend the life of the RO membrane.
2. Is it expensive to maintain RO Purifiers?
In comparison to other types of water filtration units, maintaining a RO water purification system is costly. However, you can save money by doing it yourself!
3. How much does a RO filter cartridge cost?
The price varies depending on the manufacturer of the filter. It does, however, range from 500 INR to 4000 INR.
You May Also Like To Read:
How to Buy the Right Water Purifier?
How To Purify Borewell Water For Daily Usage At Home?
Summary
Purchasing the best water purification system does not guarantee water purification for the rest of one’s life. You must also maintain it properly by replacing its parts regularly.
Some filters have an automatic alarm system that indicates when the filter or membrane needs to be replaced. For a successful filter replacement, make sure you watch out for the signs and follow the steps carefully.
I hope you found this article helpful. Let us know if you were able to replace your filter by yourself in the comments below.
