

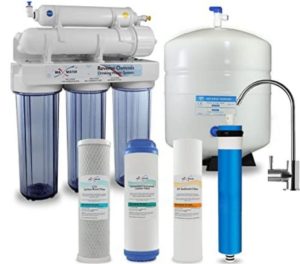
RO water purifiers are recognized as one of the most highly used and popular water purifiers among people. Several benefits like eliminating heavy metals, improving metabolism and more are some of the reasons why RO purifiers are so profoundly utilized.
According to research, one-fifth of the urban houses uses electric water purifiers, including RO water purifier. Although purchasing water purifiers are easy, assembling them is the tricky part.
Most people struggle with assembling a RO water purifier as people don’t know how this entire installation process runs.
In this article, I will mention all the steps that will assist you in assembling your RO water purifier quickly and easily.
7 Steps to Assemble RO Water Purifiers
To assemble your RO water purifier you need to follow the below-mentioned steps:
1. Faucet Installation
- Firstly you have to install a faucet that will help you provide clean and safe water. This can be a pretty hectic process. Therefore, it needs to be done in the beginning.
- If your sink includes an attached sprayer, then you have to detach it and wrap the connection with a pipe cap without any drill involved.
- If you have no hole or sprayer in your sink, then you might require to make one. You have to drill the gap with ease on a flat surface.
- Once you are done with creating a hole, then pass the faucet stem from the hole. You can secure it with a wrench from underneath the surface, slip lock washer, along a hex nut.
- Now you need to position the faucet in such a manner from where it can drain directly in the sink.
2. Drain Saddle Fitting
- Drain saddle is utilized for making a drainage connection for RO wastewater. This connection is built under the sink, and most people wind up with clogged RO systems because of errors with the position.
- Therefore, it is better to install the drain saddle away from the trash disposal. You can begin with drilling a hole of around 1/4 inch either on the side or top of the drain line.
- You can then align the drain clamp with the hole and use bolts for securing it.
3. Inlet Feed Valve
- Now you need to connect the cold water line with your purifier. But you need to make sure you follow a few crucial steps.
- Before you start connecting the waterline, make sure to close both your hot and cold water supply.
- To release the pressure in both the waterline, take the help of valves. Disengage the tubing which is linked to your cold water valve and connect the new feed valve given in the RO box. After joining the new valve, wrench it tightly.
- Now you need to attach the cold water valve tubing to the feed valve you just installed. Then you can simply switch on your cold water supply as it’s ready to work.
4. Assembling Pre-Filter
- Take the filter cap and unscrew, then slip in the pre-filter candle. Use Teflon tape to gently tighten up the filter cap to give it a perfect seal.
- Then use two connectors on one of the sides of the pre-filter.
5. Assembling Filter Compartment & Storage Tank
- Now you need to begin setting your storage tank. You need to place it near the drinking faucet, but to maintain intense pressure, you need to ensure the gap isn’t more than ten feet.
- Take the threaded port and now cover the Teflon tape over it and screw the connector. Gather the filter compartments, and then gently, you need to screw them.
6. Installing RO Membrane
- Now you need to place your RO membrane. So, unlock the RO cabinet lid. You would witness the RO membrane cylinder, and now delicately, you need to slide it.
- Then, position it on the top back and tightly secure it.
7. Running the System
- Start by inspecting all the inlet and outlet connections and checking all the screws are placed correctly.
- Make sure all the water links are secured tightly to avoid any sort of leakage. Then place the RO system where you wish to see it and then let the outlet pipe on the sink drain.
- Then you can attach the system with an electrical outlet, and now you can run it.
FAQs
How long can my RO membrane serve?
Usually, a RO membrane lasts for around two to three years. The RO membrane can be damaged early if hard water is used.
How many filters are there in a standard RO system?
In a standard RO system, you can find around three filters available. They are Carbon, Sediment and Reverse osmosis.
Conclusion
RO water purifiers can help you provide healthy RO water, which can be great for your health. The process of installing or assembling this water purifier can be a bit difficult for most people as it involves tons of devices and all.
Therefore, above, we have mentioned all the steps that can help you in assembling your RO water purifier quickly without any trouble.
Tell us in the comments if you have queries regarding installing RO water purifiers.
